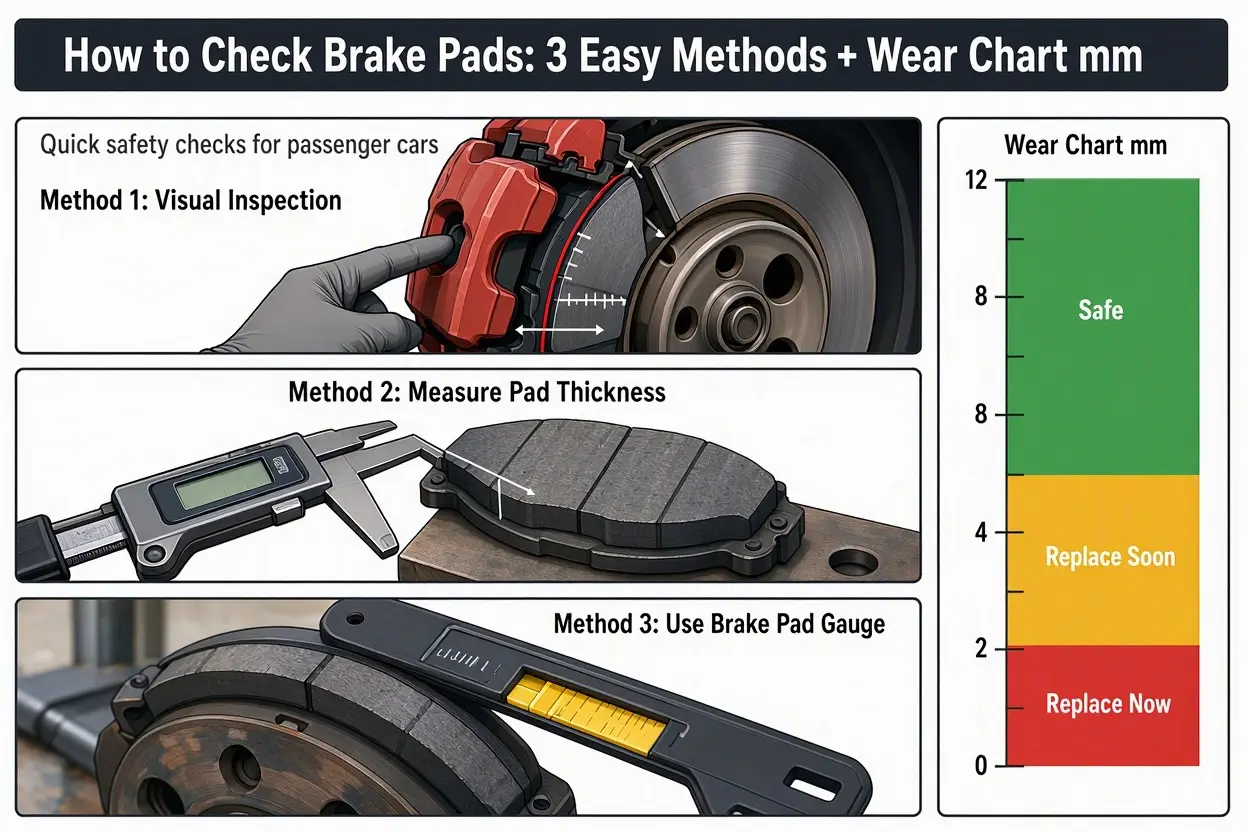
Quick answer: To check your brake pads, look through the wheel spokes at the pad pressed against the brake disc, or remove the wheel for a clear view. Measure the pad’s friction material. If it is about 3 mm (1/8 inch) or less, replace the pads now. If it is around 6 mm (1/4 inch), start planning a replacement.
Your brakes are the most important safety system on your car. The good news is that brake pad inspection is quick, needs few tools, and can catch problems before they get expensive or dangerous. This guide shows you how to check brake pads with three simple methods, what the numbers mean, and when to replace them.
Why You Should Check Your Brake Pads Regularly
Brake pads press against the discs (rotors) to slow your car. Every stop wears the pad down a little. If you wait too long:
- Stopping distances get longer
- Metal-on-metal contact can damage the discs, which costs much more to fix
- Brakes can overheat and lose performance
- You risk a serious accident
Checking your pads every few months costs almost nothing and can save you real money.
How Often Should You Check Brake Pads?
A good habit is to inspect them:
- Every 6 months, or
- Every time you rotate or change your tires, and
- Right away if you notice any warning sign (see below)
Also check before long road trips or towing.
What Do Brake Pads Look Like?
Most cars use disc brakes. Each wheel has a metal disc (rotor) and a caliper that squeezes two brake pads against the disc. Each pad has two parts:
- Friction material: the rough, gray-brown layer that touches the disc (this is the part that wears)
- Metal backing plate: the steel part behind it
When people talk about brake pad thickness, they mean the friction material only, not the metal plate.
A car has two pads per wheel, so most cars have eight brake pads in total (four wheels with disc brakes).
Tools You May Need
- Flashlight (a phone light works)
- Ruler or, better, a brake pad gauge (a cheap tool made for measuring pad thickness)
- Lug wrench
- Jack and jack stands (only if you remove the wheel)
- Wheel chocks
- Gloves
A brake pad gauge tool is inexpensive and gives a quick, accurate reading, which makes it worth buying if you check pads often.
Safety First
- Park on flat, solid ground and use the parking brake
- Let the brakes cool. They can be very hot after driving
- Never work under a car held only by a jack. Use jack stands
- Do not blow brake dust with compressed air or breathe it in. Use brake cleaner spray and wear a mask
Method 1: Check Through the Wheel Spokes (Fastest)
You do not need to remove anything for this quick check.
- Park the car and turn the engine off.
- Turn the steering wheel fully to one side so the front wheel is easier to see.
- Use a flashlight to look through the wheel spokes at the brake caliper.
- Find the pad, which is pressed between the caliper and the shiny disc.
- Look at how much friction material is left. A thin sliver (roughly the thickness of a pencil line or less) means it is time for replacement.
Limits of this method: Many alloy wheels hide the inner pad, and you cannot see the pad on the other side of the disc. Use it as a quick check, not a final answer.
Method 2: Remove the Wheel and Inspect (Most Accurate)
This is the best way to do a proper brake pad inspection.
- Loosen the lug nuts slightly while the car is on the ground.
- Lift the car with a jack and support it on jack stands.
- Remove the wheel.
- Look at the caliper and the pads on both sides of the disc.
- Measure the friction material on both the inner and outer pads. Inner pads often wear faster.
- Check every wheel. Front pads usually wear faster than rear pads.
- Refit the wheel and tighten the lug nuts in a star pattern to the torque in your owner’s manual.
Also check:
- Even wear: If one pad is much thinner than the other, the caliper may be sticking
- Cracks, glazing (shiny, hard surface), or chunks missing
- Fluid leaks around the caliper
- Rubber boots and hoses for cracks or damage
Method 3: Use Wear Indicators and Warning Lights
Many pads have built-in warning systems:
- Mechanical wear indicator: a small metal tab that touches the disc when the pad is low and makes a high-pitched squeal while driving. This is your signal to replace soon.
- Electronic wear sensor: a wire in the pad that triggers a dashboard warning light when worn. It usually needs replacing along with the pads.
Do not rely only on these. They can fail, and some cars do not have them. Still do a visual check.
Brake Pad Thickness Chart (mm and Inches)
Use this brake pad wear chart as a general guide. Always confirm with your owner’s manual, since limits vary by car and country.
| Pad thickness | Approx. inches | What it means |
|---|---|---|
| 10 to 12 mm | about 3/8 to 1/2 inch | New pads |
| 7 to 9 mm | about 1/4 to 3/8 inch | Good condition |
| 5 to 6 mm | about 1/4 inch | Getting low. Start planning a replacement |
| 4 mm | about 5/32 inch | Replace soon |
| 3 mm or less | about 1/8 inch or less | Replace now |
| Under 2 mm | under 1/16 inch | Unsafe. Stop driving if possible and get it fixed |
When to replace brake pads (mm): Most mechanics and manufacturers say to replace pads at about 3 mm. Some recommend earlier, at 4 mm, so you are not caught out.
Signs Your Brake Pads Are Worn
Wondering how do you know if your brakes are going bad? Watch and listen for these signs:
- High-pitched squealing when braking (the wear indicator)
- Grinding or growling noise. This usually means the pad is gone and metal is rubbing on metal
- Longer stopping distance or a brake pedal that feels soft or goes lower than usual
- Vibration or pulsing in the pedal or steering wheel (could point to warped discs)
- Car pulls to one side when braking
- Brake warning light on the dashboard
- Visible thin pads during inspection
- Lots of dark brake dust on one wheel
- Burning smell after heavy braking
Any grinding noise or a spongy, weak pedal needs attention immediately.
Check the Brake Discs (Rotors) Too
While the wheel is off, do a quick disc brake inspection:
- The disc surface should be fairly smooth and shiny
- Deep grooves, scoring, or a raised lip on the outer edge mean wear
- Blue or dark spots can mean overheating
- Cracks mean the disc must be replaced
- Check the disc thickness against the minimum stamped on the disc or listed in your manual
Worn pads that have ground into the disc often mean you need new discs as well.
How Long Do Brake Pads Last?
Most drivers ask how long brake pads last, and the honest answer is: it depends. As a general range, pads often last about 30,000 to 70,000 miles (roughly 50,000 to 110,000 km), and some last longer or shorter.
Factors that shorten pad life:
- City driving with lots of stop-and-go
- Aggressive braking and high speeds
- Heavy loads or towing
- Hilly or mountain roads
- Heavier cars (SUVs, electric vehicles use regenerative braking, which can extend pad life)
Factors that extend pad life:
- Smooth driving and early braking
- Highway driving
- Lighter loads
- Good-quality pads
Rear pads generally last longer than front pads because the front brakes do most of the work.
How Often Should You Change Brake Pads?
There is no fixed calendar date. Replace brake pads based on thickness and symptoms, not just mileage. As a rule:
- Inspect every 6 months or 6,000 to 12,000 miles
- Replace when thickness reaches about 3 mm
- Replace immediately if you hear grinding or the pedal feels weak
If you drive mostly in the city, you may need new pads more often than someone who drives on highways.
How Long Does It Take to Replace Brake Pads?
Just so you know what to expect:
- A professional mechanic: usually about 30 minutes to 1 hour per axle (front or rear pair)
- A beginner doing it at home: often 1 to 3 hours per axle, depending on experience and tools
If you are not confident, have a qualified mechanic do it. Brakes are not a place to guess.
What to Do After Checking
- Pads above 6 mm: Good. Check again in 6 months
- Pads at 4 to 6 mm: Plan a replacement soon and get a quote
- Pads at 3 mm or less, or noise or weak braking: Replace now
- Uneven wear, fluid leaks, damaged discs: See a mechanic to find the root cause
Always replace pads in pairs on the same axle (both front or both rear), never just one side.
Common Mistakes When Checking Brake Pads
- Measuring the pad plus the metal backing instead of the friction material only
- Checking only the outer pad and forgetting the inner pad
- Ignoring the rear brakes
- Waiting for the squeal to start before doing anything
- Skipping the disc inspection
- Working under the car without jack stands
- Using only mileage to decide, without looking at thickness
Conclusion
Now you know how to check brake pads in three easy ways: a quick look through the wheel, a full wheel-off inspection, and a check of wear indicators and warning signs. Use the thickness chart, replace pads at about 3 mm, and never ignore grinding or a weak pedal. A 10-minute check every few months keeps you safer and can save you from costly disc repairs.
Disclaimer: This article is general information, not professional mechanical advice. Wear limits vary by vehicle. Follow your owner’s manual, and if you are unsure, have a qualified mechanic inspect your brakes.
FAQs
1. How do I check my brake pads?
Look through the wheel spokes with a flashlight to see the pad against the disc, or remove the wheel for a full view. Measure the friction material on both the inner and outer pads.
2. How thick should brake pads be?
New pads are usually about 10 to 12 mm thick. Replace them when they reach about 3 mm (1/8 inch). Check your owner’s manual for your car’s exact limit.
3. When should I replace my brake pads?
Replace them when the friction material is around 3 mm or thinner, when you hear grinding, or when your stopping distance or pedal feel gets worse. Plan ahead once they drop near 6 mm.
4. How long do brake pads last?
Often 30,000 to 70,000 miles (about 50,000 to 110,000 km), depending on your driving style, load, and pad quality. City driving and heavy braking wear pads faster.
5. How often should you change brake pads?
There is no fixed schedule. Inspect them every 6 months and replace them based on thickness and warning signs rather than only on mileage.
6. How do I know if my brakes are going bad?
Common signs are squealing, grinding, a soft or low pedal, longer stopping distance, vibration, the car pulling to one side, and a dashboard brake light.
7. Can I check brake pads without removing the wheel?
Yes, sometimes. You can look through the wheel spokes with a flashlight, but you may not see the inner pad. Removing the wheel gives the most accurate result.
8. What is a brake pad wear indicator?
It is a small metal tab or electronic sensor built into the pad. It squeals or turns on a dashboard light when the pad is worn low.
9. How many brake pads does a car have?
Most cars have two pads per wheel with disc brakes, so a car with disc brakes on all four wheels has eight pads. Some cars have drum brakes on the rear, which use shoes instead of pads.
10. How long does it take to replace brake pads?
A mechanic usually needs 30 minutes to an hour per axle. At home, allow one to three hours per axle if you are new to it.
11. Do I need to replace brake discs when I change the pads?
Not always. If the discs are within the minimum thickness and are smooth, they can often be reused. If they are grooved, warped, cracked, or too thin, replace them.
12. Is it safe to drive with worn brake pads?
It is risky. Worn pads increase stopping distance and can damage the discs. If pads are under about 3 mm or you hear grinding, get them replaced as soon as possible.